
Ever wondered how I create the Storybook Tales Collection necklaces? I recently created a Harriet Tubman necklace and wanted to share my process with you today.
Harriet Tubman was born a slave in Maryland in 1822. She eventually fled to freedom, but she chose not to be satisfied with having freedom herself. Instead, she made approximately 13 trips and rescued about 70 family members and friends. (source) She carried with her a pistol and walking stick and, like others journeying the Underground Railroad, used the North Star as her compass during her night journeys.
Her courage, sacrifice, love, and determination earned her a lasting place in history and made her story one I delighted to capture in metal. As one biographer, Sarah H. Bradford, stated, “Her name deserves to be handed down to posterity, side by side with the names of Jeanne D’Arc, Grace Darling, and Florence Nightingale, for not one of these women, noble and brave as they were, has shown more courage, and power of endurance, in facing danger and death to relieve human suffering…”
After I decided to capture Harriet’s story, I needed to figure out how to turn it into a necklace.
Jewelry makers arrive at their designs in different ways. I like to sketch my ideas. I knew I wanted to include three primary elements: a cabin, Harriet’s walking stick, and the North Star.
(Sidenote: During the design phase, I learned a bit about astronomy, too. A few people questioned my showing the North Star as being part of the dipper constellation. I researched and learned they were correct in stating the North Star is not part of the Big Dipper constellation. Instead, the dipper end of the Big Dipper creates a line directly to the North Star (Polaris), which is the first star in the handle of the Little Dipper. The constellation shown in the necklace is the Little Dipper.)

The first design sketch felt incomplete because of the empty space on the right. The second design better filled that space but didn’t feel balanced. In the end, I chose to add a tree on the right and moved the Little Dipper and North Star more toward the middle. Unfortunately, I didn’t take a photo of that sketch, but you get to see the end result.
Once a design has been finalized, I begin fabricating the piece.
Each necklace begins as sheet metal and wire. My other Storybook Tales Collection pieces have incorporated sterling silver, brass, and copper. Brass didn’t seem appropriate for any part of Harriet’s design. Instead, only sterling silver and copper were used to capture her story.
The first step is to create a template for each piece. I like to make card stock templates that I can reuse. Once I have the templates pieces cut out, I trace around them on the metal then use my jeweler’s saw to cut out the pieces. I chose to cut the copper pieces first. The entire pendant measures 1 1/4″ wide and 1″ tall. Harriet measures 3/8″ tall.


After all the pieces were cut out, I pierced the stars. In metalsmithing terms, piercing refers to cutting a pattern from the middle of the metal. Technically, only the North Star is pierced in this necklace. I simply drilled small holes for the other stars.
After sawing and piercing comes soldering.
Nothing looks very pretty right after soldering, which is what you see in the photo below. The solder did its job and cemented the copper to the silver, but it also flowed onto the tree and Harriet, particularly coating her staff. This is not unusual.

Solder cleanup can be a lengthy process, but this time it didn’t take too long. After that, the really fun part began – finishing the piece.
The old saying is true. The devil really is in the details.
The tree was recognizable as it was, but the cabin didn’t look like a cabin at all. I decided to use a dentist’s drill bit to add texture to both pieces. Once I was happy with the texture, I used alcohol ink to deepen the color of the cabin and the tree and enhance the texture. The end result? Perfection. (Well, close enough.)

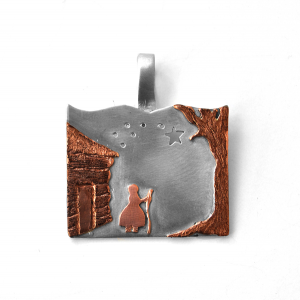
The final touches included adding a chain and packaging the necklace. I like the handcrafted copper and silver chain myself, but since some people prefer a manufactured chain, I took pictures of both options.


Fabricating jewelry takes time.
Every piece varies, but here’s the time breakdown for this necklace.
- sketch design – 1 hour
- fabricate pendant – 2.5 hours
- handcraft chain – 1 hour
In 8 hours, I can make two of these necklaces. If all goes well, that is. Believe me when I say things don’t always go well.
At craft shows, I’ve heard people murmur that my work is expensive. I agree it’s not cheap. However, when people understand what goes into making each piece, their estimation of its value quickly changes.
What do you think of the necklace? Do you have an idea for a new design? I’d love for you to comment below with your thoughts and suggestions.
I like the look of this necklace and your creation story. I’m interested in buying one. I’m also wondering if you also make it as a pin. Can you let me know the price(s) and how long it will take to ship? Thanks!